
How to make a french lavender wand. Easy instructions and it makes for a beautiful gift.
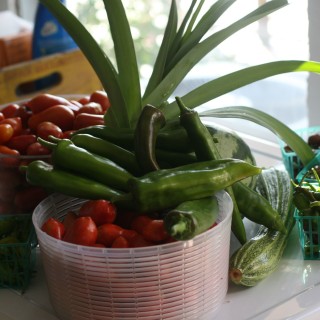
Where we live our lavender is in full bloom and has been for a few weeks. It’s so beautiful and smells so lovely. I love this perennial in my flower bed because it can easily take my bad habits of not watering it enough, a soccer ball hitting it full speed and little boys fall into it and it keeps on producing year after year.
When I was in high school I fell in love with all the romance that Provence became overly famous for at that time and I spent a lot of time reading Peter Mayle’s A Year in Provence and copying Sara Midda’s
style of watercolors. I also spent a lot of time at this fancy little French boutique where everything cost well above my babysitter’s salary. I especially loved their lavender wands from Provence, but I could never afford them. Yet each time I would wander in, I’d pick one up and smoosh it ever so gently, smell and dream. Having the ‘maker’ in me from an early age I decided to plant some of my own lavender in my parents backyard and figure out how to make my own lavender wands. They take a bit of trickery, but I’ve been making them ever since. Want to see how?
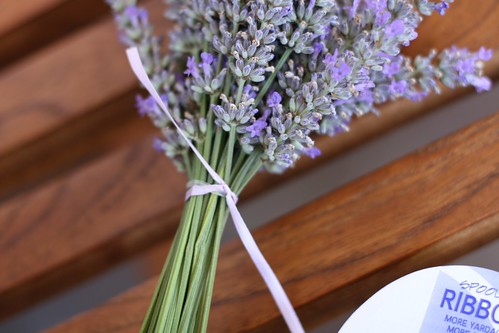
I start by gathering an odd amount of lavender stems (I think I used 35 stems here) and stripped them off all their leaves. Then I bundled them up and secured them with one of those clear plastic hair bands and tied a thin 1/8″ ribbon around that.

This next step is important to do right after you cut the lavender while the stems are still filled with moisture. Hold the little bouquet upside down and carefully bend the stems over without them breaking in half. Some will split more that you will like and that is okay, you just don’t want any to break off completely. Then I carefully start weaving the ribbon between the stems.

This is the tricky part. Those first few rows that you weave might be frusterating because the stems will sort of flopping all over the place. Hold them down firmly and try to keep your patience. After two rows they will be tamed.
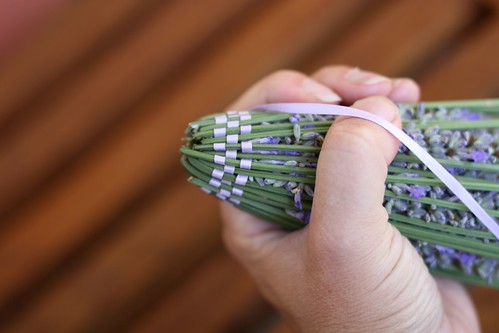
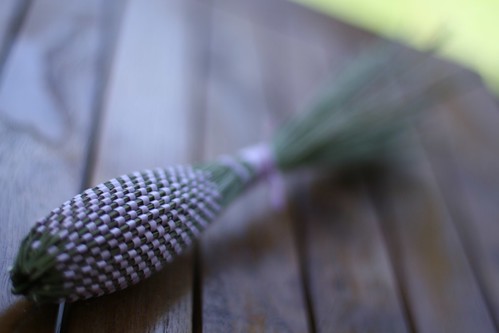
I keep weaving in and out and pull the ribbon firmly and push the weaving up with my fingernail. The stems will shrink a bit as they dry so it’s well advised to keep the ribbon pulled snug, otherwise it gets too loosey goosey over time. I made this one over the course of a couple of days when I had a chance to sit outside on our back porch. It’s a nice lazy afternoon with lemonade kind of project. When I had weaved past all of the blooms, I decoratively wove the ribbon down to a spot where all the stems would tie together nicely (see top photo) and then wrapped the ribbon around the stems a number of times. I secured this with another clear hair band and then tied a bow around the band to hid it. You may want to put a dab of clear drying glue on the bow to hold it extra firm.
I cut the ends of the stems off to a uniform length and then it was time to put it to good use in a dresser drawer. While making these wands won’t quite replace a South of France vacation at least they make me feel a little bit closer.

")


Very cool! Thanks for the instructions – I’m going to have to try this!
I was going to harvest lavender when it was blooming, but the bees were loving it so much I didn’t have the heart to take it away from them. Perhaps next year when my small plants are larger I’ll be able to do it.
I forgot to add, great job, it looks lovely.
Well, that is just lovely!
I actually have a strange problem with my lavender. I have picked the flowering branches just as the first flowers open. The dried them upside down. But for some reason, they kind of stink! I have the traditional-looking English lavender that looks similar to yours. Maybe I have a “bad” variety? The stinky-ness is pretty disappointing. Any ideas?
Hi Jackie, I wish I could help you with your stinky lavender problem, but mine has only been stinky in a good way 🙂 Maybe bring it to your local nursery and ask?
I think you’re not meant to haervest it until its gone quite dry on the plant itself, then let it dry off completely indoors; plus this gives the bees a chance to get their fill 🙂 Is it definitely lavender? Did it smell right when you were picking it?
I’ve just moved into a house with 3 massive lavender bushes, so it’s great to find some new ideas of ways to use it 🙂
Thanks!
No Michelle, you need to harvest it before the blooms open! That is if you want the essential oil to be at its peak, which is the aromatic and benificial part of the plant ; – } I like to dry mine on a screen in a cool dark place, I cut off most of the stem and this lets me dry more buds at one time. Good luck Jackie, are you sure it is lavender and not lavinden…
I recently saw catnip growing and thought it was lavender, so maybe that’s the problem.
Your wands are so lovely! I used to make them (a very long time ago it seems) to sell (for fun) at my mom’s herb shop and a local craft fair. Mine never looked quite so perfect though! Nice work.
BEAUTIFUL! Mine are very rough but useful.
This is absolutely awesome! I’m going to have to pick some lavender today and give it a shot. I’m making a lace shirt for my niece’s trousseau. If I can do it nicely, this will be a lovely item to pack with the shirt when I put it in the mail!
What a beautiful and inspiring garden project! Love it!! Thanks for stopping by at Moon Child.
Wow, this is beautiful! Thank you so very much! I have lavender in the back yard just waiting to become a lavender wand. 😉
It sounds like you’re describing my teenage years. I too dreamed of living in a beautiful rustic “bastide” in the South of France, growing lavender, nibbling calisson d’aix, and wearing vintage French linen dresses and striped espadrilles… And my copy of Sara Midda’s journal was well thumbed too!
Your wand is absolutely beautiful! I always wondered how to make them, and now I know. Thank you so much for the wonderful tutorial, as well as the walk down memory lane.
that is just absolutely beautiful! I’m going to try that NEXT time as I just the other day (and now too late) picked all my lavender and just made a standing bunch for in the loo 🙂 How clever! I’m really going to try this one.
I love this idea and it’s beautiful!
There are alot of different types od lavander. Which type do you use and have in your garden?
Wow, that’s beautiful.
Oh….I don’t have a lavendar bush. Do you sell your wands? 🙂
Tracey, I don’t sell them. We moved away from our lavender plant, but I’ll have to plant another!
I just wanted to say, I have been making lavender wands for years and yours are beautiful! and your photo tutorial is very helpful…just the way I teach the process. One trick you might employ: I use double the stems (usually 22) and wrap 2 stems at a time, with 1/4″ ribbon. It makes a very fat wand that has more fragrance bang! and did you plant that new lavender plant for yourself?
I love your blog! I wish you were my neighbor!
Is this an air freshner when complete?
Thank you for this fascinating gift idea, I have many lavender plants and will enjoy making these wands to add to my Xmas gifts.
I am impressed by your lavender wand.
I am French and I live in Provence and it’s good that our tradition travel! thank you to you!
Seven years ago I moved into a new house with no landscaping at all. We paid someone to do the large stuff and when he was done I went to town with my love for lavender. I planted 8 plants from 4″ pots. Today my lavender is so large that the stems are now stalks!! I have shared my lavender all over town, including helping a new business get started last year. I plan on cutting some this week to make some wands for the children at my church to sell for their missions project. The lavender is blooming, and the bees are a buzzing all around, but I have found that the bees are very willing to share as the lavender sedates them. I have never been stung. I do have two questions for you-1. When is it a good time to cut the lavender back? 2. Should I take the whole plant out and start with a new one?
This is a wonderful idea!! We are planning to plant lavender bushes in front of our house and this would be a great way to create our own wardrobe freshener.
Can’t wait to use different ribbons for effect.
So cool!!! Thank you!!