Mulch is a gardeners best friend. When we mulch we notice a difference in our garden almost the very next day, it’s miraculous. The plants seem to perk up a bit due to all the extra moisture retention in the soil. The mulch keeps the weeds at bay and over all gives the garden a finished look. If you aren’t familiar with it, mulch is basically a material either organic or inorganic that you put over the ground around plants to insulate the ground. If you are a garden newbie, mulching can seem a little overwhelming, there are so many choices, it seems like a lot of work and the idea of covering up the soil that you’ve worked so hard to soften and get ready for your new plants is counter intuitive. But I’ll help explain what to use, how to do it and what the benefits are so that you can mulch your garden it with confidence and ease. You won’t regret it, I promise!
First let’s talk about why you should mulch. There are so many reason to mulch:
- Helps the moisture from watering in the soil instead of evaporating into the air so fast
- Smothers weeds by preventing light from reaching weed seeds
- Shades the soil that it keeps the soil cooler therefore preventing heat stress on plants
- Likewise it also works to keep the soil warmer on cooler nights
- Keeps your vegetables cleaner
- Adds organic matter into your soil as it breaks down, increasing your soil’s nutrient content
There are so many things you can use to mulch your garden with. This year we are using straw because it’s fairly inexpensive, very effective and we already have it on hand to use for the chicken coop (and we had extra bales that we used as seating at our Harvest Party). Our favorite soil book is called Secrets to Great Soil and I highly recommend that you get a copy (it’s inexpensive) if you are interested in improving your soil. This book has a chapter on mulches which includes a great chart of all the different things you can mulch with. It rates it’s appearance, insulation value, relative cost, how thick you should lay it down, it also rates it’s weed control along with a number of other factors. It’s a great book. For the sake of simplicity, I am only going to share with you inexpensive yet effective choices from that long list. While you may want to use expensive, good looking and fragrant cocoa hulls for your front yard flowerbed, it might break the bank to use it for a large vegetable garden.
Here is a list of lower cost, effective mulch materials:
- Chopped or Shredded Leaves – Adding a 2-3 inch layer of leaves over your garden beds can be free if you have many trees on your property. It is listed as a good insulator and a good method of weed control.
- Coffee Grounds – I use coffee grounds (always less than 1 inch deep) in my potted plants. We are big coffee drinkers here so we always have plenty of grounds. This might be a good option if you are in an urban area and getting bales of hay isn’t a convenient option. Coffee grounds as a mulch is a fair insulator and good at weed control, and it looks nice too. Plus as Daphne mentioned yesterday in the comments, coffee grounds make for excellent slug and snail control.
- Compost – We typically don’t mulch with compost. While we do add compost to the soil and sometime spread a layer of compost around the plant during the growing season, we usually spread something over the compost layer as a mulch. However if you have plenty of compost it makes a good insulator and is fair at weed control. Spread a 1-3 inch layer over the soil around your plants.
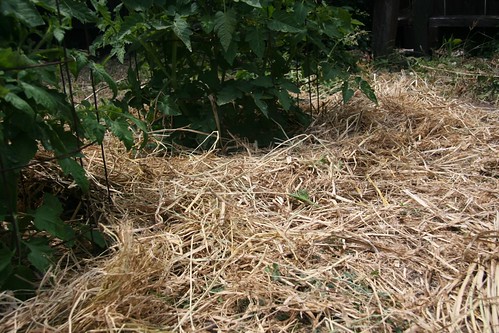
- Hay & Straw – Being that we live in an agricultural area, getting bales of hay and straw is easy and convenient. We also like the look of it as a mulch and it is easy to get the boys involved in gardening – they love to carry big armfuls of it. To be effective, you’ll want to spread a 6-8 inch layer of straw or hay on the ground to have it be both a good insulator and weed barrier.
- Grass Clippings – We use grass clippings in some places too, where big stalks of straw seem too bulky. Grass clippings are free for us and it only takes an inch of fresh clippings to provide a good layer of insulation. Make sure however that your grass is not going to seed when you cut it or you’ll get grass seed all in your garden, which is not good. Grass clippings are an excellent fertilizer too, which you can read more about here.
- Newspaper – While layers of newspaper around the garden might not be the most attractive thing, it can be a low cost way to provide good weed control. Spread several layers around plants, but make sure to avoid the colored glossy inserts. If you have the time, shred or rip up the sections for even better coverage.
- Seaweed – If you like to take trips to the coast like we do, bring a big garbage bag with you and collect seaweed on your beach walk. Seaweed makes an excellent weed barrier and a good insulator. You’ll need to add a good 4-6 inch layer to the soil which will slowly break down and add nitrogen, potash and micronutrients to your soil.
We typically add mulch right after our plants have been placed in the ground in spring. We start by keeping the mulch away from the base of the plant at first when they are little and tender and gradually add a thicker layer as the plant grows. In fall we rake all the straw and grass off and add it to the compost pile.
Do you use mulch? What do you use? What has worked and what hasn’t?
Check here to see who won the book giveaway! Thank you for all of your great suggestions and questions!

")
")

")


I tend to use salt marsh hay, straw and compost. I have too many weed seeds in my grass clippings to use it. I compost the grass clippings and my newspapers.
It’s only day five and I’m already SO into this series. I’ve learned so much. The last two days I’ve taken 7am garden walks and gathered up so many snails and slugs. My plants and my neighbors ducks are so happy-as am I. You rock!
Thanks so much for the feedback Rachel! I hope the rest of the month proves to be valuable too!
Excellent. Dang it, the blogging world is a wonderful thing. Thanks.
I am really enjoying this series, too, and thank you so much for writing about mulch. In the two years I’ve had my gardens, I still haven’t put any mulch down… mainly because I’m intimidated by all the choices, not to mention that I am still at the stage where I am moving things around a lot. If I don’t get some down this year, definitely next!
Hi,
I am so glad that you believe in mulch. I read a book on mulching, by Ruth Stout, over 20 years ago.
Here in Tn. we have a lot of fire ants and they like mulch too. That is the only trouble we have had with mulching. You can’t always see them when they make their beds under the mulch..
My husband has been a slow learner about mulch, but I believe he is catching on. I found a horse stable with old straw and horse manure. My husband went with me and we brought home a whole truck load.
After putting all the mulch in place, my sister in law went past. The next morning when we went for our daily walk, she was so excited about the garden, she actually gave us a 4+, and that was due to the mulch
Thanks for sharing.
Aunt B
Thanks for the comments Aunt B! Sounds like you need some thick gloves when you garden. Fire ants…ouch!
I live in southern Connecticut – where there are lots of trees, lots of people have a regular tree service to maintain the forested areas of their property, and when the storms come there’s always lots of tree debris to clean up.
The tree service companies, arborists, general landscaping companies, even the Town itself (!) are always looking for places to off-load wood chippings from their tree jobs, so we get on their list, and they come dump dumptrucksfull of woodchips pretty regularly on our property.
For FREE! Really, they’re just happy to find a place to offload the chips, and I’m happy to oblige!
Between raking/blowing the fall leaves right onto my beds, and regularly topdressing with my ready supply of woodchips (both of which I’ve done for over a decade now), my soil is gorgeous, and I have fat worms the size of small snakes! Yay! : )